Now that you’ve got your supplies, you’re ready to start building up your Smart-Home.The first step to getting your Smart-Home up and running is to install Home Assistant onto a Micro SD card. This is pretty easy.
What you’ll need:
- Raspberry Pi
- Micro SD card
- Definitely use a Class 10 card. Lower class cards can cause the system to crash often.
- Micro SD card reader to connect the card to your computer
- Etcher
- Hass.io download for your specific Raspberry Pi
Put Hass.io on your Mico SD card
- Un-zip the Hass.io file that you downloaded earlier. You should end up with a .img file.
- Open Etcher. You’ll get a window like this that pops up.
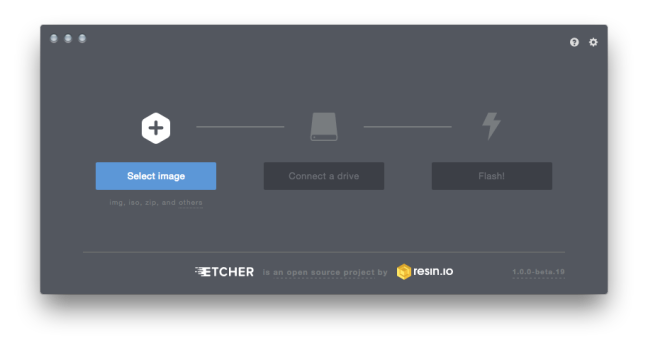
- Click “Select image” and find your .img file.
- Put your SD card into your SD card reader and connect it to the computer. If Etcher doesn’t find your card right away, you can browse for it.
- Click “Flash!”

Setting Up Wi-fi
- If you are going to connect via Ethernet, you can skip to the next section.
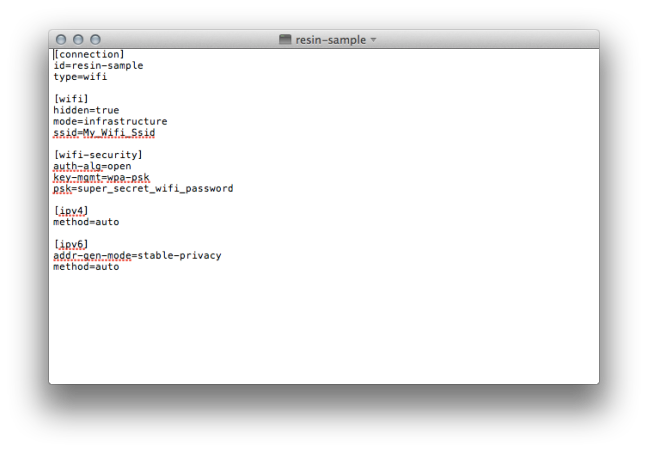
- If you are going to use WiFi, you’ll have to set up Wifi on the SD card. To do this, reinsert your SD card into the computer and navigate to the card’s files. Scroll to the bottom and open the “system connections” folder.

- Inside is a file called “resin-sample.” Right click on this file and open it using any text editor. This is how it looks in my Macbook’s TextEdit program. Double clicking the file will run the file instead of opening the file.
This file contains bidirectional Unicode text that may be interpreted or compiled differently than what appears below. To review, open the file in an editor that reveals hidden Unicode characters.
Learn more about bidirectional Unicode characters
| [connection] | |
| id=resin-sample | |
| type=wifi | |
| [wifi] | |
| hidden=true | |
| mode=infrastructure | |
| ssid=My_Wifi_Ssid | |
| [wifi-security] | |
| auth-alg=open | |
| key-mgmt=wpa-psk | |
| psk=super_secret_wifi_password | |
| [ipv4] | |
| method=auto | |
| [ipv6] | |
| addr-gen-mode=stable-privacy | |
| method=auto |
- Change “ssid” to your Wifi name, and “psk” to your Wifi password. Save. Eject your SD card and insert into your Raspberry Pi.
Connecting Home Assistant for the first time.
- If you are going to connect your Raspberry Pi to the internet with an Ethernet cable, plug that in now.
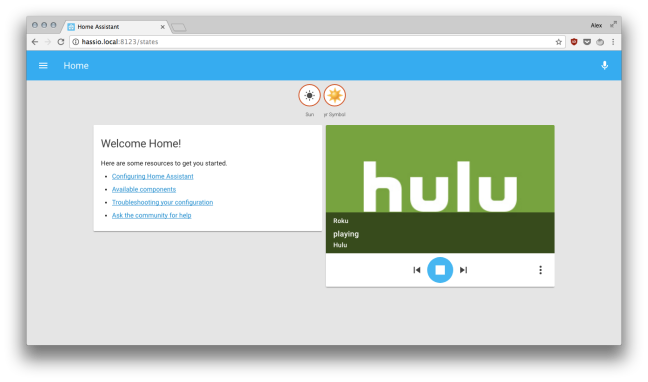
- If you are using WiFi or have already connected the Ethernet cable, plug your Raspberry Pi into its power source to turn it on. After being plugged in, Home Assistant will begin updating itself. After a few minutes, you will be able to reach Home Assistant by going to http://hassio.local:8123/ in your browser and you will see a screen like this. If you can’t reach home assistant at that address, you can replace “hassio.local” with your Raspberry Pi’s IP address. http://YOURIPADDRESS:8123/
- Go do something for yourself for about 20 minutes.

You did it!
- After Home Assistant finishes updating, you’ll see the main Home Assistant States page.

- Your new Home Assistant set up may even pick up some of your devices. You can see that my Roku Express
was automatically discovered.
Now that Home Assistant is installed, here’s a quick overview of using it.
If this guide was helpful to you , please share it! If you have any questions, please reach out to me in the comments. Thanks for visiting!

Hey do i have to change the ssid on the right side or the my wifi ssid to my wifi ssid?
IMBATMAN=MY WIFI SSID
OR
Ssid= imbatman
(imbatman as sample ssid)
LikeLike
Should be the 2nd one. SSID= imbatman
LikeLike
Ok then my wifi setup dont work cant access the hass.io from my browser, i tried multiple ip addresses…
LikeLike
Here’s a few ideas that come to mind to help troubleshoot your set up. If you plug the HDMI into a monitor, do you see the Home Assistant logo? This can show that you’re at least connected and things are loading. Make sure you’re using an appropriate power supply. I’ve had issues from not providing enough power to the Pi. You can also try logging into your router to find the IP address associated with hass.io. If all else fails, consider starting over.
LikeLike
well, if i connet it via hdmi there is a home assistant logo but after a few minutes it disapears… i cant find it with my router…ok now im going to download all over again
LikeLike
Hey Tola, were you able to access it after a fresh install? If not, did you try connecting it with a wired connection?
LikeLike
Hey, im trying to set up my hassio but i cant access to my raspy with wifi using the ip adress with :8123 at the end. but it is listed in my router (connect box)
LikeLike
Did you get set up? I’ve had issues when using too low of a power supply.
LikeLike
You had the same issue? That it only works on lan mode? My router shows me hassio with an ip but i only can reach it if i use the lan plug. Well then no wifi for hassio… At least i could set it up over lan connection… Btw can you set up samba share with multiple computers who are not in the same network?
LikeLike
I think Samba share just makes the server available to other computers on the same network. It’s not sharing with specific computers.
LikeLike